What are your top tips for rapidly and smoothly onboarding new participants in a live workshop?


Userlevel 4

Like many of you, I am using Miro for live online participatory workshop events. Almost all of the people attending my events are brand new to Miro, and by far the most difficult part of the workshop is getting them over that first hurdle of learning how to use the tool well enough to participate. Half of the difficulty is teaching them what they should avoid doing by accident!


This is much more difficult for people who are not digital natives, and in larger groups it is almost guaranteed that at least one participant will be lost and frustrated.

What have you tried? What worked best?


14 replies

Userlevel 2

Never start on a blank board. Have it populated already to show them around. 

And don´t populate it with them. Bad idea. You will confuse them. 

First they need to understand they are in a white room with no windows but 4 whiteboards.
Then they need to learn to move the board around without destroying something. (Two fingers on Touchpad instead of one finger ….)

Having mastered moving around they will learn how to edit, erase, create and move stuff. 
At this point you already can feel how adapted they are or if you need to slow down in group tasks … mastering something together step by step … to make them feel comfortable. 


Have a great time “collaborating virtually on a single point of truth (a MiroBoard)” :-D 


Userlevel 7
Badge +6

@Alan Heckman -

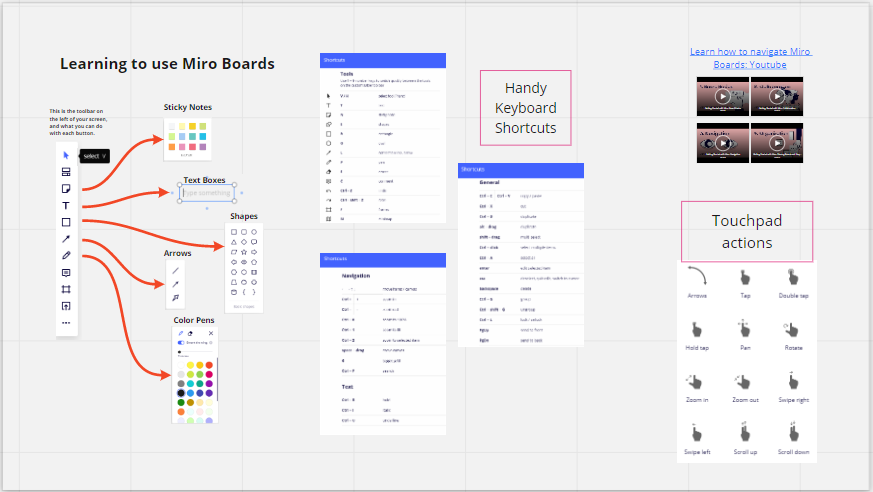
I always start with a simple “sandbox” exercise which has the specific Miro tools that I’d like the participants to get comfortable with. I also send them a brief (½ page) cheat sheet with some useful info like Miro concepts and identifying the tools in the toolbar.

Kiron

Userlevel 7
Badge +9

@Alan Heckman 

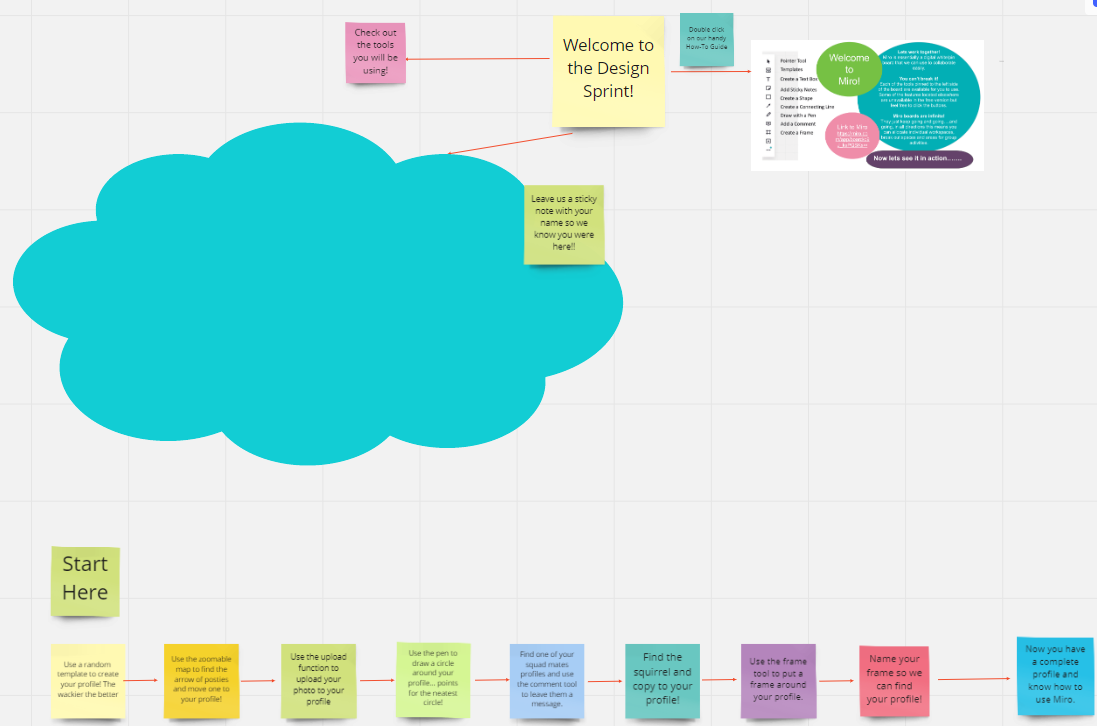
I start with a welcome picture at the beginning lead them to one already created frame, where every tool they should use in the workshop is explained and a blank test page, similar to Kirons sandbox where they can add text stickies and arrows

In one case I used four animated gifs:

  • First shows how to add stickies with text
  • Second shows how to add a shape with text including colouring
  • Third shows how to add an arrow to connect both
  • Fourth shows how to add text and formatting options


Michael

Userlevel 7
Badge +4


Great suggestions from @Caspar von Gwinner and @Kiron Bondale

@Alan Heckman Here are my own "principles":

  • Session design totally matters. If there's a large group of people and it's a short session (less than half day), I limit the tools to use and this means only Sticky Notes.
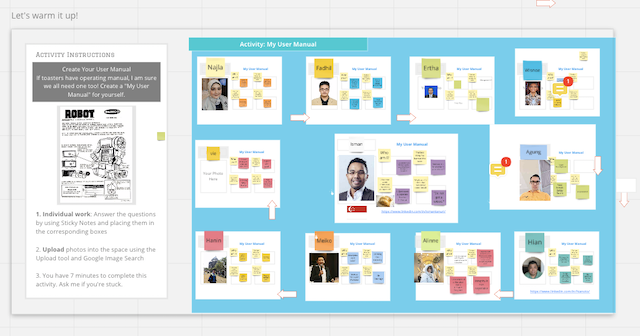
  • For longer sessions, I recommend to have at least a 20-30 minutes pre-event "Icebreaker with Miro session". I have a good success rate when asking clients to consider this. In this session, I limit the tools to Stickies, text, image upload, Google Search image, Icons, etc.. It's fun and it gets them to learn Miro quickly. You can also address tech issues in this session. An example below.
  • Also, for longer or multiple day sessions, you can slowly introduce one tool at a time.
  • Before every session to new participants, I do a "show and tell" by sharing my screen on my video conferencing tool. I go through the tools and "how to navigate Miro" features that they need to know. Most importantly, they know what I am clicking on and where.
  • Big reminder on not to unlock anything! Until we have this "master lock" feature in Miro, we have very little control. Which goes back to design, how can you have the least number of locked items on the board. 
  • Like Kiron, I have a sandbox (hardly any activity!) as well as an intro board that I include in my email comms to participants. However, not many will bother clicking through. I have shared my Intro and Sandbox below.
  • In the same email comms, I also make sure I emphasise on having a large screen for Miro and a mouse. It helps the experience greatly.

I hope that helps!


Userlevel 1

Having created a backup copy before the event starts, I begin with a quick walk-through (either miro presentation or videoconferencing screen share):

  1. open frames list, switch it to text mode, click around for quick navigation across the whole canvas (“resembles what you do in your word processor”)
  2. use the mouse wheel for quickly zooming in / out
  3. intentionally delete a prominent part of the board and use the “Undo” button to recover it
  4. use Ctrl-C + Ctrl-V or Ctrl-D to duplicate any element on the board (Having provided “clonable template” elements in all the relevant places)

Works for most ad hoc events and is a lot easier than to explain toolbar usage etc. Some people might shipwreck a few elements, that’s why I have the backup copy opened in a second tab, to restore the original design.

If possible, I don’t send around the miro board link before the walk-through, but only paste it to my chat with the participants of the respective videoconferencing call (Zoom, MS Teams, etc.), after the walk-though. I prefer to not use the miro videoconf features.


Userlevel 5

Great topic, Alan!

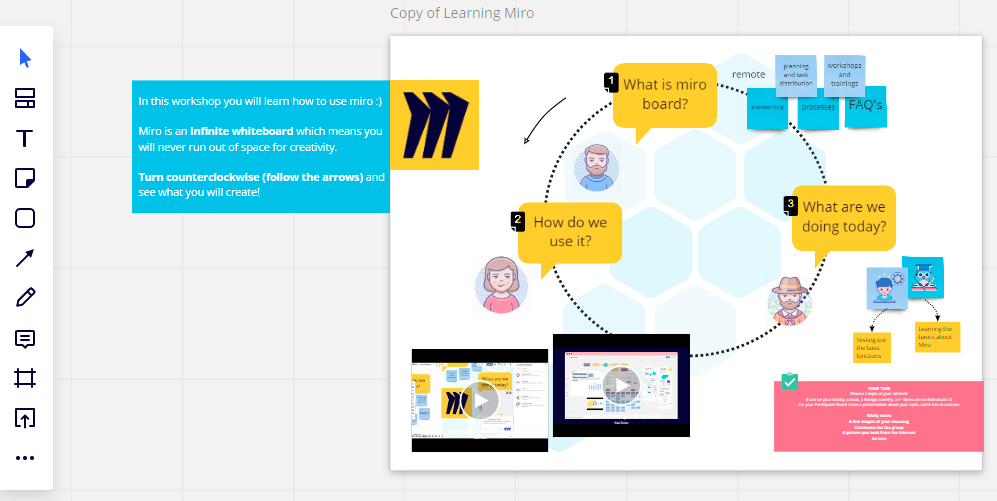
Personally I use a “Learning Miro” introduction board whenever I have a workshop or a training.

Before we start with the topic, the participants will have cca 30 minutes to work on this Learning Miro board, of course, I will give them a short introduction and instructions before :)

The board consists of a few basic information about Miro, videos embedded on the board and some exercises like:


YOUR TASK

Choose a topic of your interest.

It can be your hobby, a book, a foreign country, art - there are no limitations :D

On your Participant Board make a presentation about your topic, and it has to contain:

  • Sticky notes
  • A few shapes of your choosing
  • Comments for the group
  • A picture you took from the Internet
  • An icon


Userlevel 7
Badge +5

@Martina Crnkovic  It looks like you have embedded some videos ?  Do you have participants watch short ‘how to / demo’ videos ? 

Userlevel 7
Badge +4

@Rolf No. 3 is a very good one!

I've had that happened many times during workshop that now I can go coolly "Stop everything that you're doing and press Ctrl-Z/Cmd-Z" To have them experience that upfront is a really good idea. I shall put this in my checklist.

Userlevel 7
Badge +4

@Max Harper From my experience, Max, they never do :P I always default to a 5-min Miro "show & tell" of critical tools before sessions with new participants.

Userlevel 5

@Martina Crnkovic  It looks like you have embedded some videos ?  Do you have participants watch short ‘how to / demo’ videos ? 

Hi Max, we actually made a short video on how to start using Miro and watch Miro tutorials, and we find that the participants try out the tutorials, however, are learning best by simply doing and following the facilitator’s guidelines.

The second video is this one (we use it so the participants can get a wider picture of what Miro is): 


Userlevel 3

I’ve adapted our usual in classroom introduction to include how to use Miro - it goes something like this: 

  1. I share my screen with Miro on it and explain the toolbar and basic navigation
    • I usually stick with the select and sticky tool for the entire workshop
  2. I then send the Miro link via Zoom or Teams chat. 
  3. I have everyone take a seat in a virtual circle by grabbing their first post-it choosing a colour, resizing it and typing their name. 
  4. Then I usually have some sort of Goals for the workshop or your experience with topic XYZ grid so that they can experiment with longer text and moving dots or stars around. 
  5. I talk about doing something you might regret and then undoing it.
  6. I end with a frame where I have a quick rundown of everything I just covered including all relevant keyboard shortcuts.

I make a point of saying that it’s ok if they make mistakes and that we’re all here to learn and they’ll leave being a Miro expert as well as the other learning they’ve come for. 

Userlevel 1

I have created a power point ( they are familiar with this format) with the Miro basics and outlining what the left side toolbar basic features are. I send this through as a pre-read with a login to a “ test board” the day before the workshop. 

The test board is populated with the content in the power point and some free spaces for them to play in. 

On the day of the workshop I have created a treasure hunt type activity for new users to complete, so far this have proved to appeal to the widest range of learning styles. 


I have also found we can get through this activity in around 15 minutes and it gives an acceptable level of competence to the participants. 


Userlevel 5
Badge

Like others, I also want to give them a quick tutorial with a “sandbox” where I ask them to do the first essential skill … create a stickie note, and type their name on it.  This gives me a sense of who is understanding the instructions and the format, and give’s me an attendance reference. I also include a frame with quick reference guides.


When sending the “intro” boards to multiple attendees, do you have to make several copies for each and every attendee? How does each person get their own “clean slate” of a template to work from?

Reply