Win an iPad Pro: share how you Miro in the online classroom templates challenge 🧑‍🏫

  • 30 August 2021
  • 26 replies
  • 3307 views
Win an iPad Pro: share how you Miro in the online classroom templates challenge 🧑‍🏫
Userlevel 7
Badge +5

Hi Miro Community :raised_hands_tone2:


We believe the 2021-22 school year is an opportunity for all educators to shine even brighter. Now, with all the new skills you’ve cultivated over the past year of distance learning, you can create engaging, blended learning experiences that incorporate the new tools and technology you mastered.

:zap:  Today, we’re kicking off the How Do You Miro? Online Classroom Templates Challenge! 

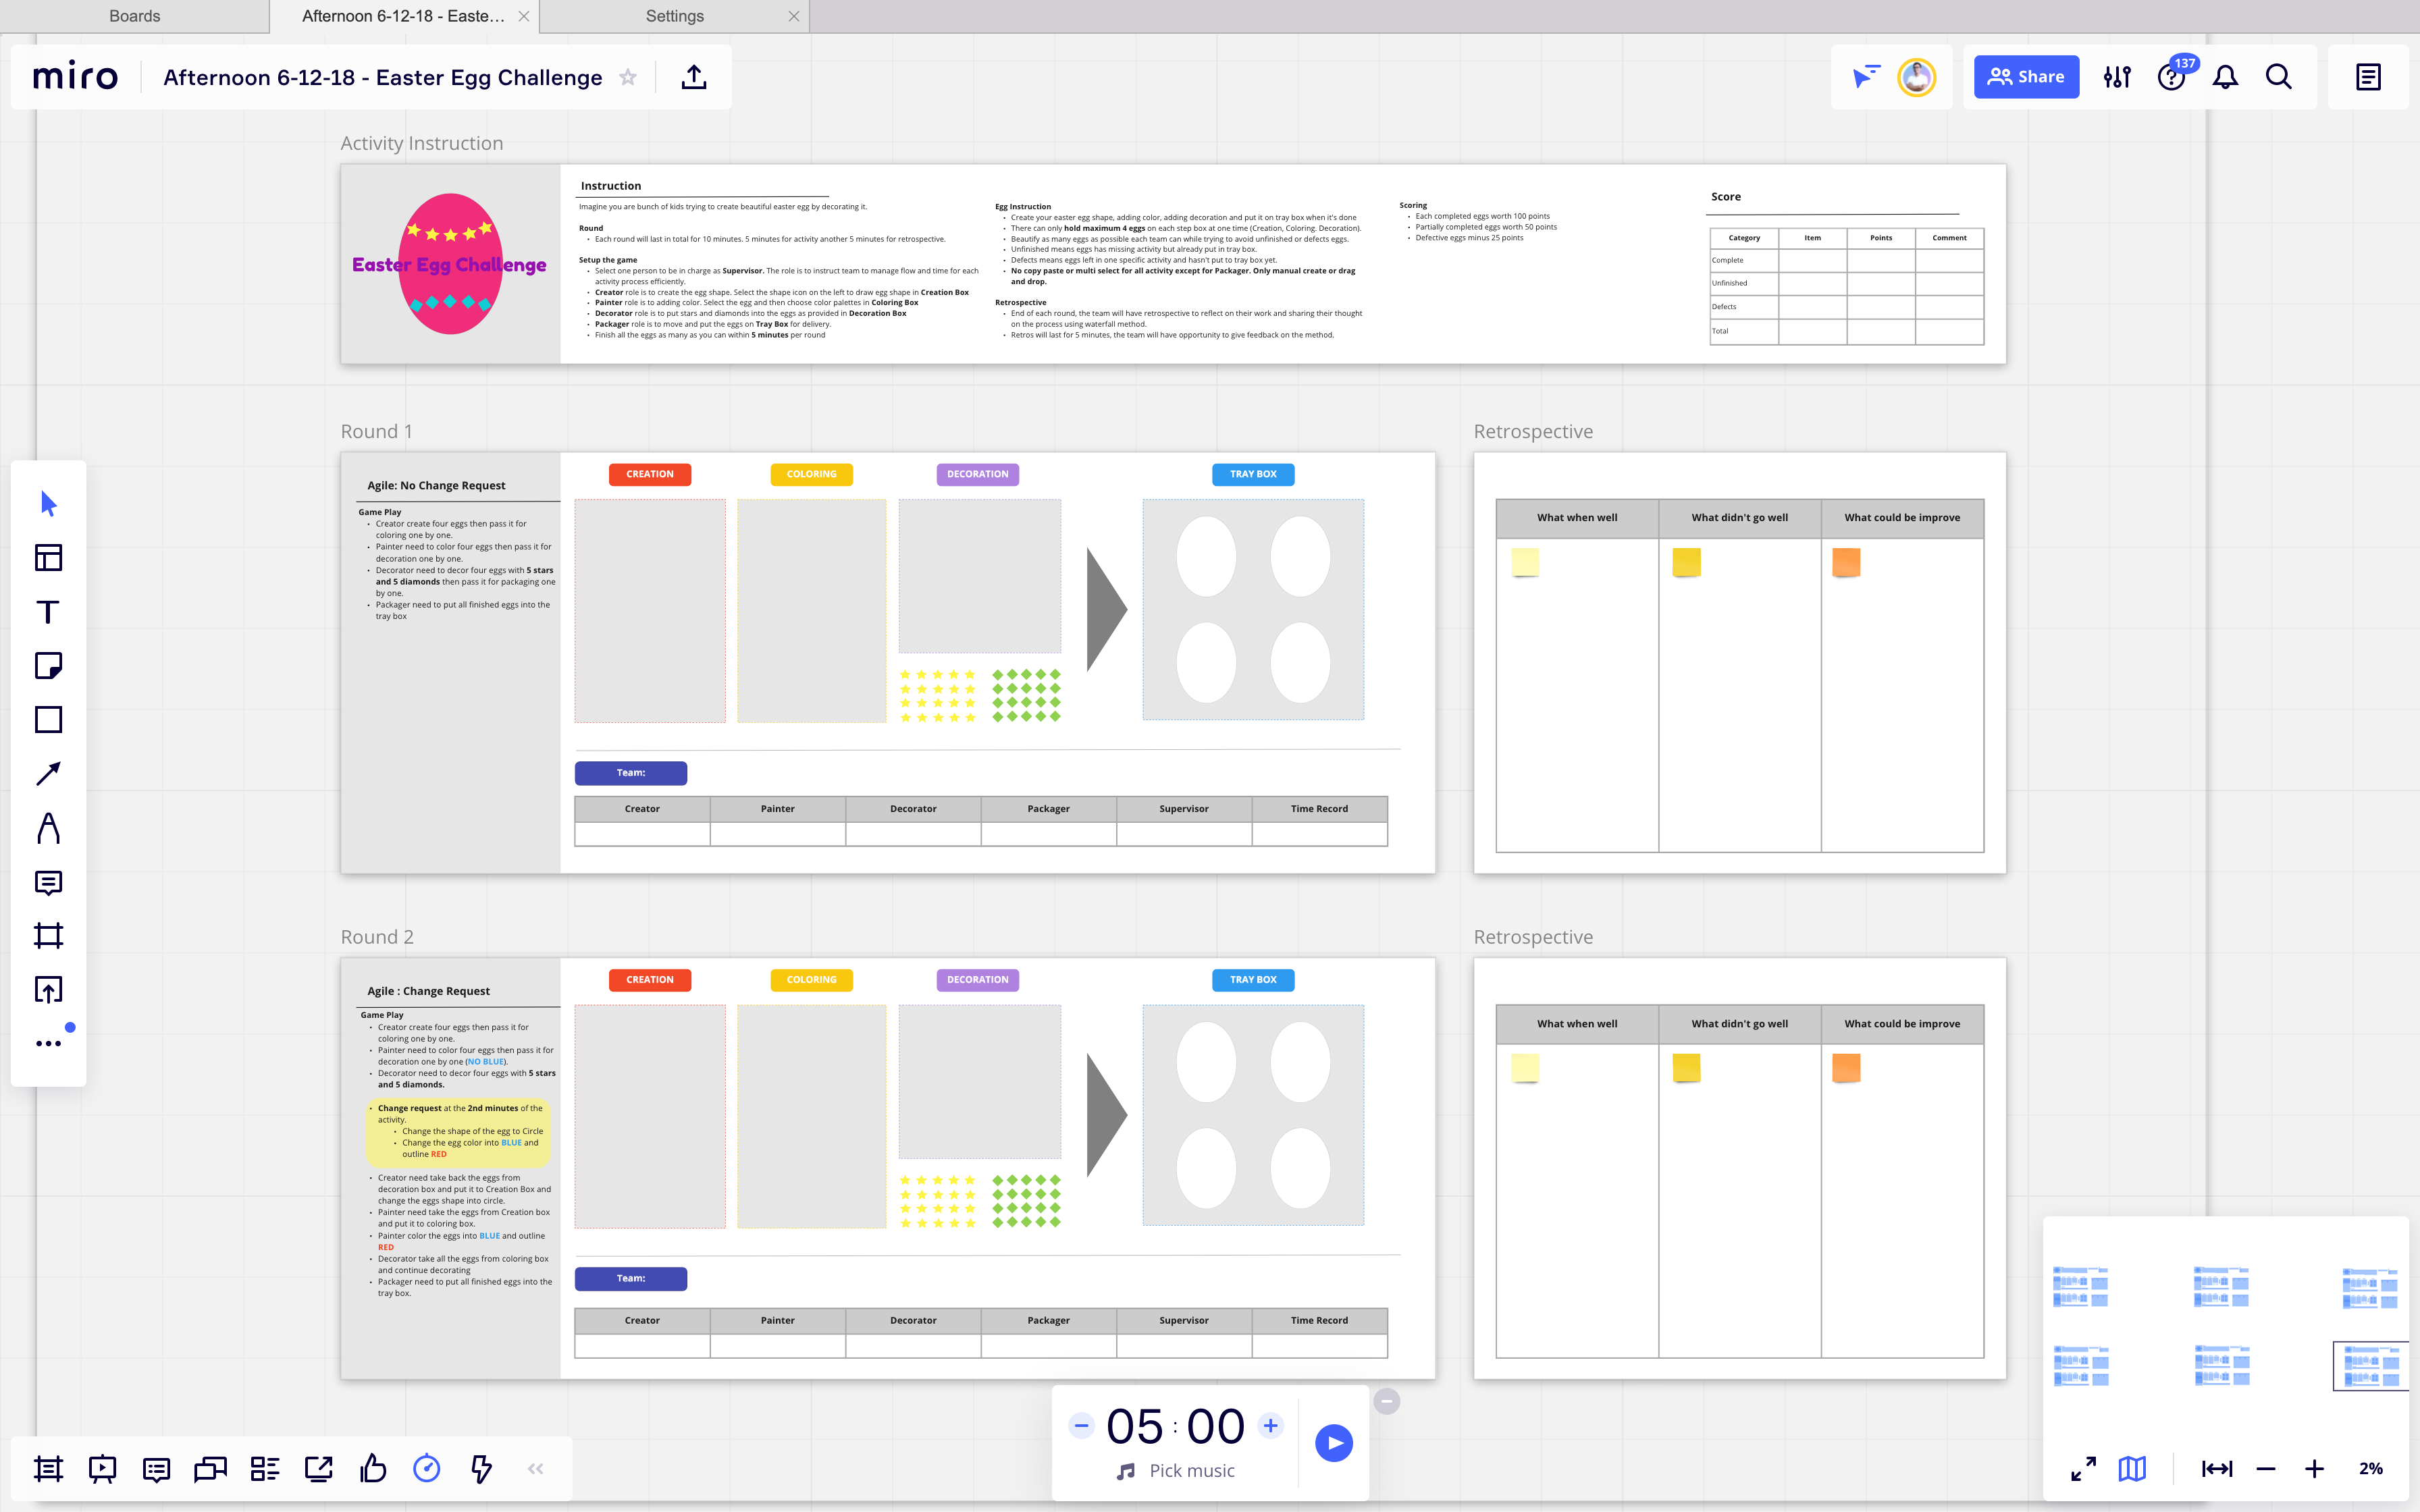
This contest is all about best practices for online whiteboarding and classroom collaboration. We’d love to see your favorite activities for online or blended classes that work on the virtual whiteboard. Please share with us and with the Miro community your best examples of collaborative activities such as: 

  • Problem-solving
  • Case studies
  • Field surveys
  • Learning games
  • Investigation groups
  • Exhibitions 

Of course, if there's a group activity that went over really well online or in a blended class, let us know all about it!


:bulb:  NoteIf you’re a student or educator and you don’t use Miro EDU plan - just apply! It’s free and has lots of advanced features! Also, don’t miss a blog post about Miro’s back-to-school resources.


Challenge details


:calendar_spiral:  Timing

  • Submission period: Sept 1 - Oct 5 (11:59 PM CET)

  • Voting & judging: Oct 6 - Oct 11 (11:59 PM CET)

  • Winners announced: Oct 12

:ballot_box:  Voting & judging

  • Judges' Choice will be awarded by our panel of expert judges. Submissions are judged on their ease of use, layout, and that special fun factor.

  • People’s Choice award will be based on top likes under the comment here in the online community. Make sure to vote for your favourite template by Oct 11 :point_up:

:gift:  Prizes

  • Judges’ Choice - iPad & exclusive Miro branded cover & Apple Pencil

  • People’s Choice - AirPods & exclusive Miro branded case

  • All submissions are considered for Miroverse. We’ll send you Miro Swag if your template gets published on Miroverse.


How to participate


To enter, please add a comment in this thread with the following details:

  • Your full name

  • Role and company

  • Miro board embedded with your template (view access)

  • Instructions on how to use the template

  • [Optional] 1-3 min video overview of your template
     

Entry requirements:

  • Must be in English

  • Created and designed using Miro

  • All information must belong to the board owner. We will reject all submissions containing copyright-protected content on board (e.g. no Disney characters, frameworks that clearly belong to someone else)

  • By participating in the challenge, you agree that your submission may be published and used for promotional activities by Miro


Judges

  • Community Guest Judge: @Richard Kasperowski - an author, teacher, speaker, and coach focused on high-performance teams. He wrote High-Performance Teams: The Foundations, and he teaches Agile Software Development at Harvard University.
    :paperclip:  Check out Richard's templates on Miroverse

  • Miro Knowledge Expert: @Natalie Nedre - EDU Program Manager at Miro. Natalie has been supporting Miro EDU users with a dedicated program since March 2020. She has evangelised the creation of the Education category in the Miroverse and regular Templates library. 

  • Miro Knowledge Expert: @Julien Savy - EDU Partnerships Manager at Miro. Over the past year Julien has worked closely with Universities and EdTech companies on growing partnerships in the Education space and creating more value through collaborative projects for students and professors.

  • Miroverse Team Judge: @Mariam Danielian - Mariam coordinates the content production for Miro templates and oversees Miroverse templates library publications. She is inspired by the creativity of Miro users who turn an endless empty canvas into a universe of their own creation and is passionate about sharing their work with others.


Happy collaborating and good luck! :rocket:


:question:  FAQs

I can’t leave a reply in this thread

Please make sure to first click Join group in this page -> Educator Forum.


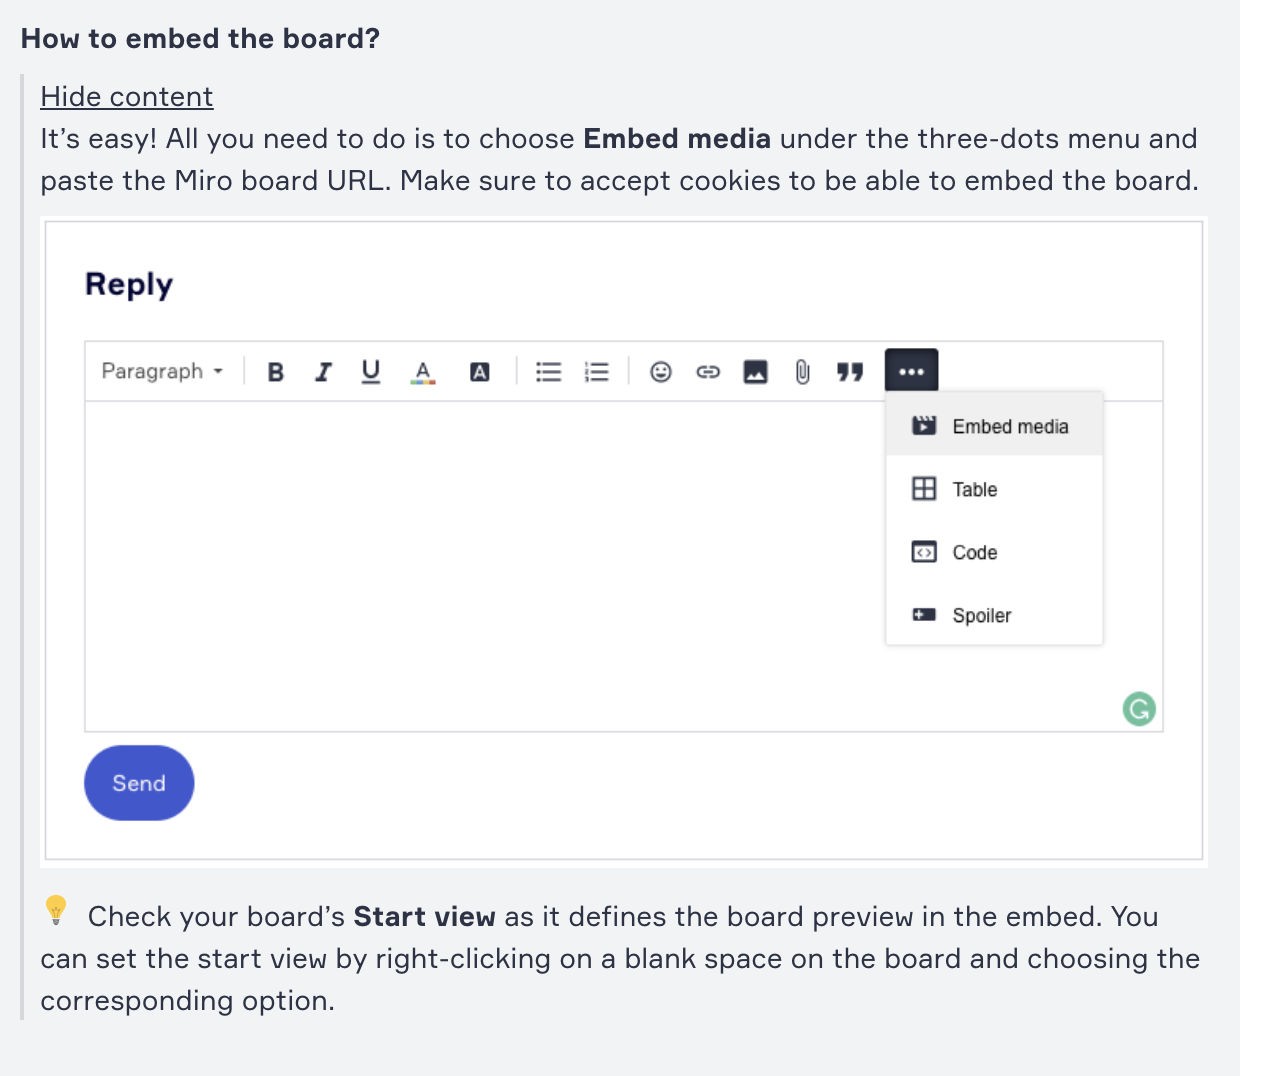
How to embed the board?

It’s easy! All you need to do is to choose Embed media under the three-dots menu and paste the Miro board URL. Make sure to accept cookies to be able to embed the board.

-cRu-qDUbfojJrZ7LEMdUb24Q2qeOv3HWYk2mLUZkrsXiAcv8zX6iu3NV_SOUdUu7aQQMaDOkZ6Jvjmwsk2vWCM70iMapQaTtiNSfA5aM2kVHtsH2DSouo1h5bJLWV2Loqcoh2bQ

:bulb:  Check your board’s Start view as it defines the board preview in the embed. You can set the start view by right-clicking on a blank space on the board and choosing the corresponding option.


I can’t embed the board. ‘The provided domain is not supported’ error

Please accept cookies in order to be able to embed the Miro board.


 The template is awesome! Can I use/copy it? 

Some templates can be chosen to be added to Miroverse, so please stay tuned! If you need this template right away, please reach out to the author directly.


Can I post more than one template?

Yes.


Can I win both prizes? 

No, one submission can’t win both awards. If there’s such a case, then the People’s Choice will go to the submission with the second largest number of likes.


26 replies

Userlevel 7
Badge +2

@Trudy A Watt i’ll message you now! :)

Userlevel 1
Badge

Hi Miro Team - @Marina @Natalie Nedre - happy new week! I’ve been trying to reach out via private message as you asked me to but I’m not sure my messages are coming through. Will you please be in touch?

Userlevel 3
Badge +1

Thanks all for sharing the knowledge together, it was great to know on how wonderful your work on Miro Creation and how to implement it on your teaching! Congrats for the winner too

Thanks to you too Miro Team and Judges! @Natalie Nedre @Marina @Richard Kasperowski @Julien Savy @Helena Brandist @Mariam Danielian 

Userlevel 1

Hi All, Congratulations to the winners! It was great to see all the other creations from the Miro EDU community!

Userlevel 3
Badge +3

Hello @Derick Mbenyi @Anabel Ojeda @TWilkes @Indra Kusuma @Jenny Kowalski @Trudy A Watt @mlanders I learned a lot from you all just by observing all the amazing work you all created! It’s great to create templates and learn alongside through out this challenge journey! 

Thank you to Miro Team and Judges @Natalie Nedre @Marina @Richard Kasperowski @Julien Savy @Helena Brandist @Mariam Danielian for hosting this challenge to get our templates in online classroom out into the world! It’s amazing to see how so many diverse ideas and templates are shared to help educators in the classrooms, that really shows the magic of Miro!

Keep up the great work and looking forward to seeing more Magic happens at Miro Community and The Distributed! 

Userlevel 7
Badge +9

@TWilkes and @Peter Schwöbel and @Robert Johnson :

Thank you a lot for voting for my template:boom::hugging::dizzy:

And ... Thank you (drumroll) miro @Natalie Nedre @Marina and all other mironeers - for giving me this opportunity to design a template that was long time in my head and now through this Online Classroom Template Challenge found it’s way to reality. Thank you!!!

Michael 

Userlevel 7
Badge +5

Yay! Congrats, @Trudy A Watt @mlanders @Frankie Kok :tada::tada::hugging:

Userlevel 5
Badge +2

@Trudy A Watt @mlanders @Frankie Kok please reply in private messages to me - as we need your delivery addresses and contact phone numbers, so we can send the prizes.

Userlevel 1
Badge

Woo hoo - thanks, Natalie! And thanks to the judges and team who put this challenge together. It’s so great to see what everyone is up to with Miro.

My students will also be jazzed to hear this. They know best of all how much I love to experiment with Miro in the classroom - both fully online and now that we’re back in-person/ in occasional hybrid mode.

Congrats to the other winners!

Trudy

Userlevel 5
Badge +2

Hi everyone and especially @Derick Mbenyi @Anabel Ojeda @Frankie Kok @TWilkes @Indra Kusuma @Jenny Kowalski @Trudy A Watt @mlanders 

Ta-da! I am happy to announce the winners of this How Do You Miro? Online Classroom Templates Challenge 

Ladies and gentlemen, 
🥁🥁🥁

The winners are:

Congratulations! 
👏👏​​​​​​​👏

The prizes will soon be on their way to the winners.

We want to thank everyone for participating in this challenge and sharing your awesome boards! 

Stay tuned for the next challenge!  And if you don’t want to miss it, subscribe to this category to receive an email notification when we launch a new contest.

Have a good one

Userlevel 5
Badge +2

Hi @Derick Mbenyi @Anabel Ojeda @Frankie Kok @TWilkes @Indra Kusuma @Jenny Kowalski @Trudy A Watt @mlanders and all the guests of this challenge!

Many thanks to all participants for sharing your amazing boards! I’m here to tell you that we closed this thread for new submissions today, and our judges take a week to choose the winner. 

Public voting for the People’s Choice is also open until Oct 11th (EOD), so let’s get voting!

➡️Please put a thumbs-up under the post if you like the template.
🔊Participants can also share a link to this thread with your network and get their support.
☝️NOTE: we only count the likes  under your comment here in the Miro online community.

Stay tuned! We will get back to you on Oct 12th and announce the winners.

  • Instructions:

Dots&Boxes is a simple game from the 19th century, originally played with pen and paper. The game has different titles like just boxes, dots, pigs, etc. It is suitable for people of different ages and with a few additional rules it can be played in teams as well. It is a game of logical and strategic thinking, planning, sacrifices and observation. I though that it would be cool to bring it in a digital tool like Miro and that’s why I created this template with instructions on how to play it. It falls into the category “Learning games” but it can be used as break-the-ice activity in the classroom as well as in other settings.

Below are some instructions on how to use this template:

  1. Read the rules on how to play the game in the Rules frame. Players takes turns and each player draws a horizontal or vertical line, connecting two dots. The player who draws a forth line and forms a square (box) should put a Sticky note with their initial inside. The Rules frame contains examples of what to do and what not to do, that’s why it may look complicated but it’s not.
  2. Based on the number of players the Players frame can be expanded with more sections. Each player can choose a Sticky note and colour and thickness of the line they will use. In Miro the available sticky notes are only 16 which can be a limitation but this rule of the game can be replaced and instead of sticky note, the players can use the text tool and just type their initials. With this replacement rule, the game can be played by many players at the same time.
  3. The player board is an array of dots and based on the time available for this activity and the number of players it can be expanded with more dots or reduced by deleting dots. The “shape” of the array can be square or rectangle.
  4. To make the game more convenient and easy to follow (especially if many people are playing), I prepared a frame called Waiting area. The idea is those players that are waiting for their next turn to “stay” on this frame instead of on the board because they might try to cheat by drawing more lines, changing initials on the sticky notes or just distracting the other players. If those rules doesn’t apply or are not that important for your players feel free to remove that frame and the relating rule from the Rules frame.
  5. The game ends when all dots are connected and no more squares/boxes can be formed. Now it’s time for counting. I think it would be fair if there is one person (maybe the organiser) who should count the sticky notes of each player and add them to the Results frame. There is a small “stage” there so the three players with the most sticky notes can be mentioned there as winners. 
  6. As I mentioned the game can be used in different settings and that’s why I included a frame called Additional rules suggestions just as an inspiration for teachers who want to try it out with their students and make it more educational for example by including questions on a specific topic or dividing the players into teams and involve them in different activities which will allow them to draw a line(s) upon success or why not skip a turn.

I hope you like this template, try it out with your students/team members and have fun playing a classical game in a digital environment! 

Userlevel 7
Badge +9
  • Michael Landers

  • Back into a better Job-Coaching & Different kind of classes & semiars in an educational institute for all kind of people that are searching for new jobs.


  • This template is an
    Already to use template for a class / online session where you can set up your own elements / texts / elements - but it has also a lot of elements inside that offers you the option to use varied tuition. For this I used different parts / options that are available in miro:
     

  • This template was created for classes with 3 groups / tasks


They are starting together as one group:

Going into their breakouts:

of course with the timer setted for the groups:


Each group has got their own task:

Two example sites (a table and a PDF-Site) included:


One site for each group to work and to show their results is also on board:


After they’ve finished working they’re coming together in the main group and then they’re presenting their results:


The board contains already created links for each group and section that’s inside:


 And an explanation is inside how to edit the links:


Also voting after the groups have presented their result is included:

And a Homework-Section is inculded (Visual-Notes is used) and explained with a How-To-Video:


Also included an example of an integrated extrenal service and you see how to embed this into your miro board via iframe:


Bonus-Content is also inside for each group the same:


Userlevel 1
Badge

Trudy Watt

Assistant Professor, School of Architecture and Urban Planning

Teaching Fellow, Lubar Entrepreneurship Center

University of Wisconsin - Milwaukee


I use this template on the first day of class as an easy ice-breaker to facilitate introductions and then as a collaborative exercise to set course norms, or agreements. The template is set within a color wheel I built, so students have their favorite color as “home territory” for the day. (As a side note, I sometimes make use of these self-assigned colors later in the course through drawing exercises in the studio.)

Instructions:

Step 1 - BLUE Square - If you were not a human being, what would you be? (time dependent on how many students there are)

Everyone finds an image online and uploads it to their own blue square. Then ask students to bring their images over to the blue circle in the middle. Introductions are made via students’ chosen entity (sometimes, but not always an animal).

Step 2 - RED stickies - What are some examples of suffering in class? (4-5min)

Ask students to think of a time when they burning out, overwhelmed or otherwise suffering (not, struggling!) in studio/class. What behaviors, habits or actions could you observe in yourself, your classmates or faculty when you were suffering?

Step 3 - YELLOW stickies - What are some examples of thriving in class? (4-5min)

Ask students to think of a time when they were thriving in studio/class (happy, curious, feeling creative, feeling “on” or satisfied, positively challenged. What behaviors, habits or actions could you observe in yourself, your classmates or faculty when you were thriving?

Step 4 - Synthesis and Agreement

After the students have worked through these rounds of brainstorming, I have used the temple two different ways to develop community agreements, or norms.

  1. Set the students on another task while I organize stickies into common themes, or
  2. Go around the room asking students to add a sticky to the large red or yellow area, in turns. As a student adds an example of thriving or suffering, ask if any others have a similar example. Ask students to cluster stickies with similar ideas. Once you have exhausted all of the stickies (this took about 20 minutes with a group of 15), you can observe together what types of behavior, habits and actions have the greatest impact to support thriving in class. Form a handful of short, memorable phrases that everyone agrees to.

Step 5 - (optional) I then add these community norms to a blank page reserved in my course syllabus and redistribute to the students.

Here’s an example of what this template looks like complete, with names redacted:


Userlevel 7
Badge +5

Hi everyone,

:warning:  Please note that we’ve changed the dates of the challenge:

  • Submission period: Sept 1 - Oct 5 (11:59 PM CET)

  • Voting & judging: Oct 6 - Oct 11 (11:59 PM CET)

  • Winners announced: Oct 12

We hope more people will be able to participate and share their templates :pray_tone2:

Jenny Kowalski, Assistant Professor of Instruction in Graphic & Interactive Design, Tyler School of Art & Architecture at Temple University

Accessibility Scavenger Hunt

The devices we use everyday come with a ton of tools for accessibility. This scavenger hunt helps students recognize accessibility tools, demonstrate how they work, and understand more about how the world can be designed for everyone.

For this activity, students were divided into teams of 3-4 people. This activity would work in an in-person, hybrid, or virtual classroom. The entire activity took around an hour and a half to introduce and complete.

To use the board, copy the “team 1” area and duplicate it for as many teams as you have. 

Each team adds team member names to their area of the board. They review the resources and work together with their computers, phones, and the world around them to post a screenshot or photo of each listed accessibility tool, app, or feature. 

After they complete the activity, they use sticky notes to reflect on their experience. 


Here are screenshots of a completed Scavenger Hunt board: 

Completed activity including photos of computer screens and phone screenshots
What surprised you about this Exercise? Sticky note responses say: “I never realized there was a transcript option  on podcast for people to read along.” “I was surprised for how many different options there are to aid people who are hard or hearing or visually impaired.” “I am surprised that there sensory warnings for videos were just put in place about a year ago on tiktok. Plus there are some videos that do not have those types of warnings for one who is sensitive to flashing lights.” “You can potentially put captions on a face time call??”
What surprised you about this Exercise? Sticky note responses say: “The computer features being in a different space” “the number options I didn't know existed” “I never knew about smart inverted colors on the iPhone” “things that seem high contrast to me (a fully sighted person) are not high contrast”
What do you want to learn more about, and why? Sticky note responses say: “I would like to learn more about color blind safe palettes and incorporate them into my work” “I would like to learn more about media and videos (i noticed apple podcasts didn't have transcripts)” “I also think it'd be cool to learn how they test out the visual accessibility modes to make it work for everyone”


Userlevel 3
Badge +1

NAME: Indra Kusuma

COMPANY: Business Mentor, Apple Developer Academy @BINUS Indonesia

MIRO BOARD:


EASTER EGG CHALLENGE


Who doesn’t love playing Easter Egg when we were kids? 

This Miro board used to help learners to get to know the differences between Waterfall vs Agile Method on Project/Product Management and practically understand when to use each methods in a FUN and ENGAGING way within Groups.


Why project/product management methodology matters?

Building products is a collaborative process involving many functional groups. Cross-functional teams need to work together systematically to deliver value efficiently and effectively. Using a common methodology helps drive success by providing a clear set of guidelines for how work will get done.


There will be 2 activities, first is Easter Egg Challenge using Waterfall Method and second activity using Agile Method with 2 different scenarios:

  1. No request changes
  2. With request changes in the middle → This is the fun part, as they need to change it quickly and requires great coordination of teamwork. 

Each activity consist of 2 rounds:

  • 5 min for the Easter Egg Challenge
  • 5 min for Retrospective

Before this session mentor/moderator will explain a bit about the project/product management in general and how waterfall v Agile works. Then we can ask learners to participate and try to apply each methods.

Setup the Game

  • There will be 2 rounds per method, total will be 10 minutes
  • Each team will be consist of 5 persons:
    • Supervisor: Act as PM to manage the flow of the teamwork
    • Creator: Create the egg shape
    • Painter: Adding color to the eggs
    • Decorator: Decorate eggs with stars and diamonds
    • Packager: Move and put the finished eggs to Tray Box
  • Finish all the eggs as many as you can within 5 minutes per round

Egg Instruction

  • Create your easter egg shape, adding color, adding decoration and put it on tray box when it's done
  • There can only hold maximum 4 eggs on each step box at one time (Creation, Coloring. Decoration). No adding or removing while each activity still on progress.
  • Beautify as many eggs as possible each team can while trying to avoid unfinished or defects eggs.
  • Unfinished means eggs has missing activity but already put in tray box.
  • Defects means eggs left in one specific activity and hasn't put to tray box yet.
  • No copy paste or multi select for all activity. Only manual create or drag and drop.


This activity will required assistance from mentor to be a time keeper. One of the mentor can start the timer on Miro Board will appear on the lower screen, pick music to increase the intense vibe during activity would be great option!


Once the time's up, mentor can help to check the eggs result, there will be 3 categories:

  • Finished (100 pts) → Eggs done completely
  • Unfinished (50 pts) → Eggs left behind in one of the steps box
  • Defect (-25 pts) → Eggs already in Tray Box, but have missing steps (i.e. coloring, stars/diamond decoration incomplete)

Help them to calculate the final scores in the table as follows, to separate between round 1 & 2 you can add ( / ) in between scores:

Retrospective

  • End of each round, the team will have retrospective to reflect on their work and sharing their thought on the process using waterfall method.
  • Retros will last for 5 minutes, the team will have opportunity to give feedback on the method.

Example of the end result:


When the game is done, we can summarized and getting feedback or questions from learners what already learned in the activity about the two different methods and how it can be applied on their team for further product development. Dare to Try?😎

Userlevel 1

NAME: Ted Wilkes

COMPANY: Regent’s University, London / University of the Arts London


MIDPOINT ANALYSIS TASK

This board is used to teach students how to watch films like a Screenwriter and to assist them in exploring ‘the midpoint’ of the narratives that they write. The midpoint of any story is an important moment of realisation for any protagonist and is often one of the more explosive and emotionally engaging moments within a narrative.


Before this session in their pre-class work, they are tasked with engaging with a short video essay outlining how to write a good midpoint.


As they arrive at the session, they are asked to anonymously respond to an Understanding Matrix so that I can see their level of confidence and knowledge about the theory which will underpin the work that we will do in the session so that I can check understanding and uncover who has done the pre-class work.


After that, I outline that during the session we will be analysing midpoints of various films and further check understanding by asking students to use sticky notes to outline what they will be looking for when watching the clips. We then reflect on the answers that they give and students are able to offer their own approaches to analysing scenes and sequences of films.


They are then set off and allowed to begin analysing the clips embedded into the board (they have been taken out of this one so as not to infringe on copyright). Students are encouraged to use dynamic resources (videos / podcasts / voice notes) to respond to the task and to comment and reflect on the responses of their fellow students synchronously.


This is a task that I use to teach first year undergraduate students who often will not have done a huge amount of scene analysis so I offer a huge amount of scaffolding which is mostly hidden at first using the ‘hide frame’ function but depending on the levels of engagement / struggle of the students using the board I can unhide them to assist them. 


In plenary we come together as a group and the class share their responses to the task and discuss their interpretations of the scenes.


Before leaving the class I unhide the final ‘Reflections on Learning’ section which is another Understanding Matrix activity. This allows for me to check the understanding of the class at the end of the session and hopefully see that there has been improvement after the session.

Userlevel 1

NAME: Ted Wilkes

COMPANY: Regent’s University, London / University of the Arts London

SCENE ACTION SESSION


INSTRUCTIONS

This is a Miro board for a workshop that I run for Screenwriting students focusing on improving the scene action in their writing. The board is used throughout the five hours that we spend together during the week, and I encourage students to take ownership over the space, using the board as they see fit either completing the individual or group activities that are set.


Each section of the week is divided into the didactic explanation of the theory which informs the activity that the students complete and then the activity which is based on the explanation they have just heard. After they have completed the activity, we then share these with the rest of the class to feedback and reflect on.


For example, in section 8 students learn about ‘Imagematic Writing’ (Dynamic Imagery) and why it is important to their writing process. In section 9 they then discuss in groups the various examples on the board and identity elements of this within them.


Whereas in section 10 they gain an insight into how to develop their understanding of psychological writing and techniques that they might want to look at to externalise their character’s thought process. They then watch one of the clips in section 11 and reverse engineer it to write a sequence that could eventually become that filmed sequence.


As I encourage students to take ownership of this space, they can choose when and how they tackle the exercises within the learning environment. I am happy for them to attempt the exercises without engaging with the didactic learning first and refer to it should they need some additional guidance.


In addition, it may be that in the future I look to make this whole board an asynchronous activity which takes place across the module it is included within that we can dip in and out of to assist students in improving this important part of their writing.

Userlevel 1

NAME: Ted Wilkes

COMPANY: Regent’s University, London / University of the Arts London


WHAT IS TELEVISION? NAM JUNE PAIK - THE VIRTUAL MUSEUM

INTRODUCTORY VIDEO:


INSTRUCTIONS

I teach a module called Critical Television Studies in the Twenty First Century and one of the questions that we always start with is: What is TV? A question that if asked maybe five years ago would be a simple(r) one. However, now with the various cultural and technological advances on the small(er) screen (and smallest screen) the ideas about what TV is has changed dramatically.


One of the most engaging ways I have found to explore this topic is using the artwork of South Korean artist Nam June Paik. Paik’s seemingly provocative but genuinely insightful observations on television and broadcasting conveyed a reviving utopian ideal of open and democratic communication, while fully conceding the increasingly prevalent dominance of the apparatus of political, social and economic institutions. In short, he was asking questions through his art about television long before we knew that we (as a society) would be.


I was hoping that I might have been able to take my class to the Tate Modern in London to see Paik’s work first-hand and to engage with it in the way that the artist wanted us to. However, with the pandemic this was not possible, and I was forced to rethink my class. After attending a virtual evening at The British Museum from my flat in London, I decided to replicate an experience like that for my students within Miro and I began transferring my lecture slides for the session into a curated virtual museum for Paik’s work. I grouped the various themes which are on display in his work as if they were the rooms of the museum and added further information, prompts for discussion and dynamic resources so students could further research his art.


This had two great advantages for me. Firstly, the session was now far more active and experiential with students able to immerse themselves in the work rather than sit and listen to a didactic lecture. Secondly, they were able to “see” other pieces of art from various museums in Amsterdam, Berlin and New York all in the same space.


For the session, I introduced the thesis of the week and the learning objectives for the class and allowed them to freely wander around the virtual space in small breakout rooms exploring the various pieces with curated prompts and discussion points which accompanied them. They were able to interact with the dynamic resources on the board and in some cases see the work move as it would in real life.


For the plenary of the session, we returned together as a class and discussed what we had found interesting about our time in the virtual museum. What was great was that within the discussion (and peppered within the curation cards) were various theories and theorists who we would be further exploring during the module so they were able to have an introduction to names and ideas that we would be covering later on in.


Students were then asked to reflect on their time “in” the virtual museum by producing a micro paper which formed the opening exercise of the next session about the spectacle of TV and WWE.

Userlevel 1

NAME: Ted Wilkes

COMPANY: Regent’s University, London / University of the Arts London


MIRO INTERMEDIATE WORKSHOP TRAINING SESSION


INSTRUCTIONS

As it was with many other institutions at the beginning of the COVID-19 pandemic Regent’s University, London faced a litany of challenges. With the sudden and dramatic pivot to online learning, lecturers from every department now had to find ways to engage students synchronously from over 100 countries across the globe. I was offered to take on the role attempting to facilitate this process and during my research into digital tools found Miro which is a platform that I have championed since discovering it.


This session here is an intermediate workshop that I delivered with members of staff from across the organisation looking at some interesting ways to use various functions within Miro in the post-pandemic classroom to create active and engaging sessions in student focused learning environments. During the session I showcased some of the lessons learnt during remote teaching and highlighted how I think that we are going to be able to use the tool in a blended / face-to-face environment in the future.


The opening section detailed some basic starter activities that I have used in other sessions (Understanding Matrix, Hopeful Stickies and Meme Show and Tell). I then outlined the rationale for the session which included strategies to capture lost learners, stimulate kinaesthetic learners and reclaim the “phone screen” in the digital classroom.


The middle section of the session was dedicated to outlining some of the intermediate functions of Miro such as:


  • The timer and adding drama to sessions with a countdown.

  • Using the link function to have students work in groups at opposite ends of the board, create One Drive/G Drive repositories to hand in work and/or allowing for a ‘question post box’ to anonymously ask/answer questions a student might have.

  • Hiding frames to control access to information in order to reveal key information at the right time or allow for scaffolding if needed during the session.

  • Rewarding exploration during the session with unique resources hidden in “corridor spaces” or elsewhere on the board.

  • Allowing for independent study away from the classroom with video essay resources that can be engaged with as an alternative to the didactic/group work for anxious or disaffected learners who prefer to study solo.


I then offered staff the opportunity to engage with some case study sessions that I ran during the beginning of the pandemic to see how I used the tool in an entirely virtual space. They were free to do this in breakout groups in order to discuss and reflect, or they were able to stay with me and have the creative commentary behind each of the sessions and how I will be adapting them to face-to-face learning.


Finally, we returned in plenary and completed an ‘I Like / I Wish / I Learned’ activity in order to capture the responses of the attendees and allow for structured reflection on their experience during the workshop.

Userlevel 3
Badge +3

Hello everyone, I am Frankie Kok, Founder at The Creative Gym.


I am sharing Rethink Ambiguity, an intangible experience made tangible through navigating a design challenge that’s full of ambiguity, visualizing ambiguity using a journey map tool, and reflecting on our ambiguity experience.

How does Rethink Ambiguity works? 

  • Warm-up: Participants start with describing their day using the journey map tool to gain an understanding of the tool and build a connection with others
  • Design Challenge: The participants then join a role-play scenario to simulate a design interview as "design consultant" while knowing only a little about how their team might work together or what questions they might ask.
  • Reflection: The participant reflects on how their interview experience using a journey map. In the end, the group shares their insights with each other.

Our Story 

If you are interested to learn more, here is a short story about how I have collaborated with Brian Chien to facilitate workshops with the Stanford k12 lab community using the 8 design abilities at Stanford d.school to empower change in the k12 education space. 

Rethink Ambiguity by The Creative Gym


From Process to Abilities

From Carissa Carter, the Director of Teaching and Learning from the d.school, we learned the importance of moving from the design process to design abilities, using cooking as an analogy  

“ The order and process of a recipe helps new cooks get started, but it’s only with practice, inventiveness, experimentation, and constraints that you might begin to call yourself a chef”

“At the d.school we endeavor to enable our students in eight design abilities so that they might develop their own creative confidence and also inspire others, take risks, and persevere through tough projects throughout their lives. We want our students to be their own unique chefs. ”


Rethink Ambiguity 

This inspired us to create Rethink Ambiguity for students to develop their creative muscle and design abilities through experiencing an ambiguous situation, using the design tool to recognise ambiguity, and reflecting their feelings, actions, and strategies that can help them in the future when they are facing ambiguous situation in real life.


Why experience Ambiguity? 

“ Ambiguity makes creative work extremely challenging to do well but can also lead to the greatest opportunities for design.” d.school

When we design beyond the exchange between the facilitator and participants but also incorporating the uncertainties from the real world, the participants can experience the richness and complexity of the world, where they are put into a situation to develop the confidence and the urgency to act so that they can embrace navigating ambiguity as part of their creative work.
 

Pk8mqprLI7yi9xi9p9lzd4l7mL06bjQnYNOBmAMQ3JJosdHyobv49tTVFtNo6jSn_H0leZUCQXqyk_Kxus9NroKDXCgEwITkBGwDovYOkb1CZqFKMWg93IBl1JSHJncw4QyY74Tw=s0

How Rethink Ambiguity empower change? 

At the end of the workshops, the participants reflected on the ideas and tactics that can help us navigate ambiguity better together: 

Lj7N7ein-ed3bhxxl1VsWCjW3E9nRXvFk7mq_RKBqvPnPClStxwKR2gETgmS0oSVyem5aqhFBsn5_JrM_TD4oh9DPtcykoSc13nKSEAvdmbww3DkvAmGt2IlXvitSsZ2NfM9FC3-=s0

And rehink ambiguity with:  

kOMWr_PPfazI5TEaStXrvoZGOS9sTTVdkrFSJsymOIQ1JpKy42m_412SsY2dsdOX7egEG6BPgxMEbQgdFii9sH3gNGikjvrtemDxnJOq5Db7XJLzCDicYOShMD2M_paL5gfePRA3=s0

We have also heard stories like Eva, who is a school principal, applied the journey tool to lead the teachers through the uncertainties in the next semester's strategic planning, she did it with more clarity and calm despite not knowing what's happening during the school closure due to COVID-19.

Name: Anabel Ojeda Hernández

Role and Company: Student of Facultad de arquitectura UNAM

Miro board:


Hi everyone, I'm Anabel, I started using Miro last year for the online school and it is very practical for me. And for my experience with my teachers and classmates. I make this templet to help you to be more organized in your class online, classroom o mixted so I'm explain how to use it

How to use the template:

The template has four general sections.

•   The first one: Organization

In this section you will find a box where you can place: year, month, school year and the name of the subject.

It works as a calendar, when you double click on it, you can edit it to change each month or insert some important dates or presentations of teachers or students.

On the right side you will find the switch types that are used to assign content with a specific color, if you click you can add a title, with right click on it you have the option to: assign the date in a calendar, as well as integrate certain users who are part of that team.

At the bottom there are two boxes, one for frequently ask teacher's questions and another to place your contact information in order to find it easily. You can edit them by double clicking (you can add as many boxes as you want).

•   The second one: Evaluation

In this box you can place the evaluation rubrics of the activities, from the upload option either in PDF, JPG or PNG format, from your device or through a url.

•     The third one: Programming and links

Here you can place as many switch types as you want, with a click you can add a title, with a right click the option opens so you can place a direct link to the different presentations either: Boards on miro, in a personal folder or another program, it also allows you to add the date that was seen in class etc. It is a very useful tool because all students can review the old presentations of their classmates when they want or the teacher can upload the class presentations in a more orderly manner and without confusing the students. On the right side, I inserted a sticky note to place the grade of the presentation or a comment from the teacher.

•    The fourth one:

It is a blackboard on which teachers can do quiz games, post notices etc. You only have to press the N key to place a Sticky note, select a color and you are ready to go!

I hope this template will be useful for both students and teachers.

Userlevel 5
Badge +2

SUBMISSION EXAMPLE (live template from from Miroverse)

  • Name Surname

  • Learning Designer at Imaginary Institute


  • How to use the template - more info on the board

    • With its modular design process, the Learning Design Tools provide a simple yet flexible template for constructing and writing learning objectives and assessment strategies with the Learning Objective Design Deck and the Learning Assessment Design Deck

      A design cycle with the Learning Design Tools can be run individually or in teams as a design studio-like session. It makes the process of designing learning objectives creative, collaborative and even fun.


Userlevel 5
Badge +2

Hi @Derick Mbenyi 
Thank you for the first submission! 
To make sure your design can participate in the challenge, can you please check if all the rules are met? 


To enter, please add a comment in this thread with the following details:

  • Your full name

  • Role and company

  • Miro board embedded with your template or at least paste a link to the board (view access)

  • Instructions on how to use the template

  • [Optional] 1-3 min video overview of your template


Reply